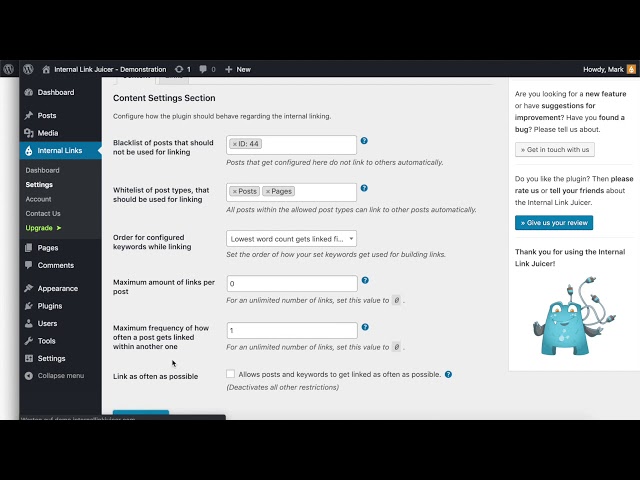
Setting up your Link Countings
Depending on your unique needs, the Internal Link Juicer offers three types of settings for Link Countings: “Maximum amount of links per post”, “Maximum frequency of how often a post gets links within another one” and “Greedy link mode”. You’ll find these options by clicking on “Settings” on the left-hand bar, then the “Content” tab at the bottom:
Don’t forget that after every update to this section, you must click on “Save Changes” at the bottom of the tab.
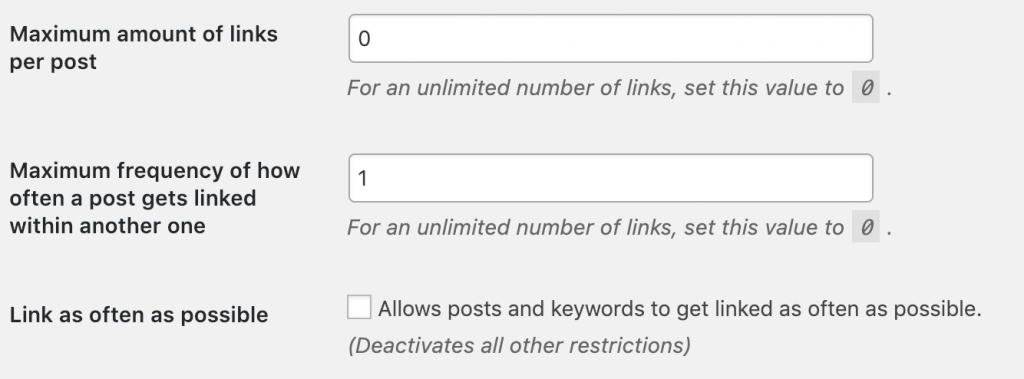
Maximum amount of links per post
First, “Maximum amount of links per post” is a setting that controls the limit of how many links you want to be generated in a post. If you don’t want your post to be overwhelmed with links, be sure to set a maximum that is right for your content.
In practice, the limit you set means that even if more keywords are configured – triggering more links to be generated – these links won’t appear because of the set limit. Let’s say your limit is five links per post. Even if 10 links are available for your post given the keywords, only five links will show.
Remember that link generation in your posts is chronological per default. Whatever keywords are configured first will be linked first. This means that if you add a new keyword, but you’ve already reached your set limit, a link with that keyword will not be generated. To resolve this issue, you would have to raise your limit or change the order the configured keywords get used through the plugin settings.
If you don’t want to set a maximum amount of links per post and prefer it were unlimited, just enter 0 into the text field and click “Save Changes” below.
Maximum frequency of how often a post gets linked within another one
This setting is similar but distinct from the maximum link limit per post. In this case, you’re configuring how frequently a single URL is linked. Think of the user experience of reading your content. How many times do you want a link to the same URL? More often than not, content creators would set this limit to one because they want diverse links to different posts. However, you know best when it comes to your content.
Now let’s look more closely at how this maximum link frequency works. Let’s say you configure a post A with the keywords “hyperlink” and “link”, in that order. If you set your maximum frequency to 1, this means that within any post that contains both these keywords, a link to post A will only be generated with the first keyword added – i.e. “hyperlink”. Remember that it’s not the first keyword that appears in the post, but rather the first keyword added chronologically. In turn, if you set your maximum frequency to two, both keywords will link to post A.
If you’re interested in having no limit for the frequency of a single URL, you can set the value in the text field to 0. Don’t forget to click “Save Changes”, too.
Greedy link mode
Finally, “Greedy link mode” is an option that you can activate if you’re interested in creating the most links possible. This is the perfect choice if you want to build links and connections throughout your content with no limits on links or single-URL frequency.
To activate “Greedy link mode”, just check the box “Link as often as possible” and click “Save Changes”. This will create all possible connections between keywords and URLs. For example, let’s say text A has keywords 1 and 2 and a text B has keywords 1, 2 and 3. Under the “Greedy link mode”, all configurations will match. In other words, keywords 1 and 2 in text B will both link to text A. Now you can see where this setting gets its name!
In general, “Greedy link mode” disables all other options in order to link wherever possible throughout your content. This setting will typically create multiple matches for different configured keywords.
Whenever you update any of these Link Countings settings, don’t forget to click “Save Changes” to keep your updates.
Watch the video below and you will see all the different types demonstrated in depth.